If you’ve plugged in a USB flash drive, SD card, or external hard drive and received the error message “The volume does not contain a recognized file system,” don’t panic. While the error might look serious, it’s a common issue that usually means your computer can’t read the file system used on the drive. This often happens when the drive was formatted for a different operating system (such as macOS or Linux), or has become corrupted due to interrupted transfers, malware, or hardware wear. In many cases, the data on the drive is still intact, it’s just temporarily inaccessible until the file system can be read correctly.
Every storage device uses a file system to organize and store data. Popular file systems include:
- FAT32: Common on SD cards and USB drives; compatible with most devices, but has file size limitations
- NTFS: The default for Windows hard drives and SSDs; ideal for large drives and supports advanced features like permissions and encryption
- exFAT: A newer system for flash storage; ideal for cross-platform compatibility with macOS and Windows and supports large files
- EXT (EXT4, EXT3, EXT2): A family of file systems used primarily on Linux systems; Windows cannot natively read these without third-party tools
- APFS: Apple’s modern file system used on newer Macs; not readable by Windows without third-party tools
- HFS+: Used by older macOS systems; still found on many older Mac-formatted drives and Time Machine backups
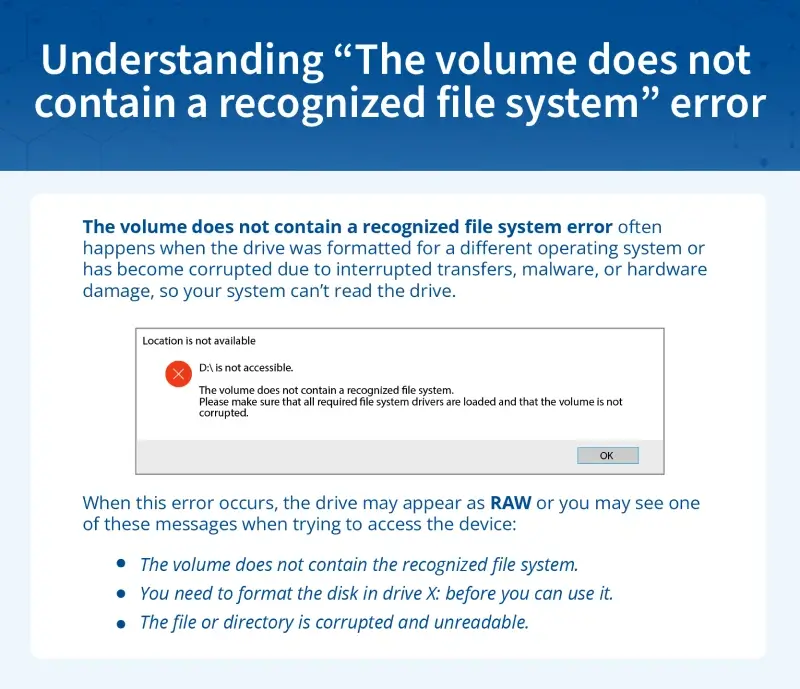
If something prevents your operating system from recognizing the file system — like corruption, improper formatting, or physical damage — the drive may appear as RAW. This means it appears unformatted or unreadable, triggering the error “the volume does not contain a recognized file system.”
You may also see one of these messages when trying to access the device:
- “You need to format the disk in drive X: before you can use it.”
- “The file or directory is corrupted and unreadable.”
These messages are your system’s way of saying: “I can’t read this drive because something’s not right.”
This issue can affect many types of storage devices, including USB drives, external hard drives, SD cards, SSDs, memory cards, and even internal hard disks. And while formatting might seem like a quick fix, doing so will erase the data currently stored on the device. That’s why it’s crucial to approach this issue carefully, especially if the drive holds important files.
At Secure Data Recovery, we specialize in recovering data from unrecognized or RAW drives, including external hard drives and HDDs. With decades of experience and certified cleanroom technology, we’re here to help you retrieve your data safely and securely.
Diagnosing and fixing the file system error
When your computer displays the message “The volume does not contain a recognized file system,” it’s natural to feel a bit stuck, especially if you’re not sure what caused the error or how to get your files back. This type of error can stem from a range of problems, from simple compatibility issues to more serious physical damage. Some situations are easy to fix on your own, while others require professional tools and expertise.
To help you figure out what’s going on with your device and what to do next, we’ve put together a clear breakdown of the most common causes behind this error along with the symptoms that can help you identify them. The table below is sorted by how likely it is that you can fix the issue yourself and includes suggested next steps based on your specific scenario.
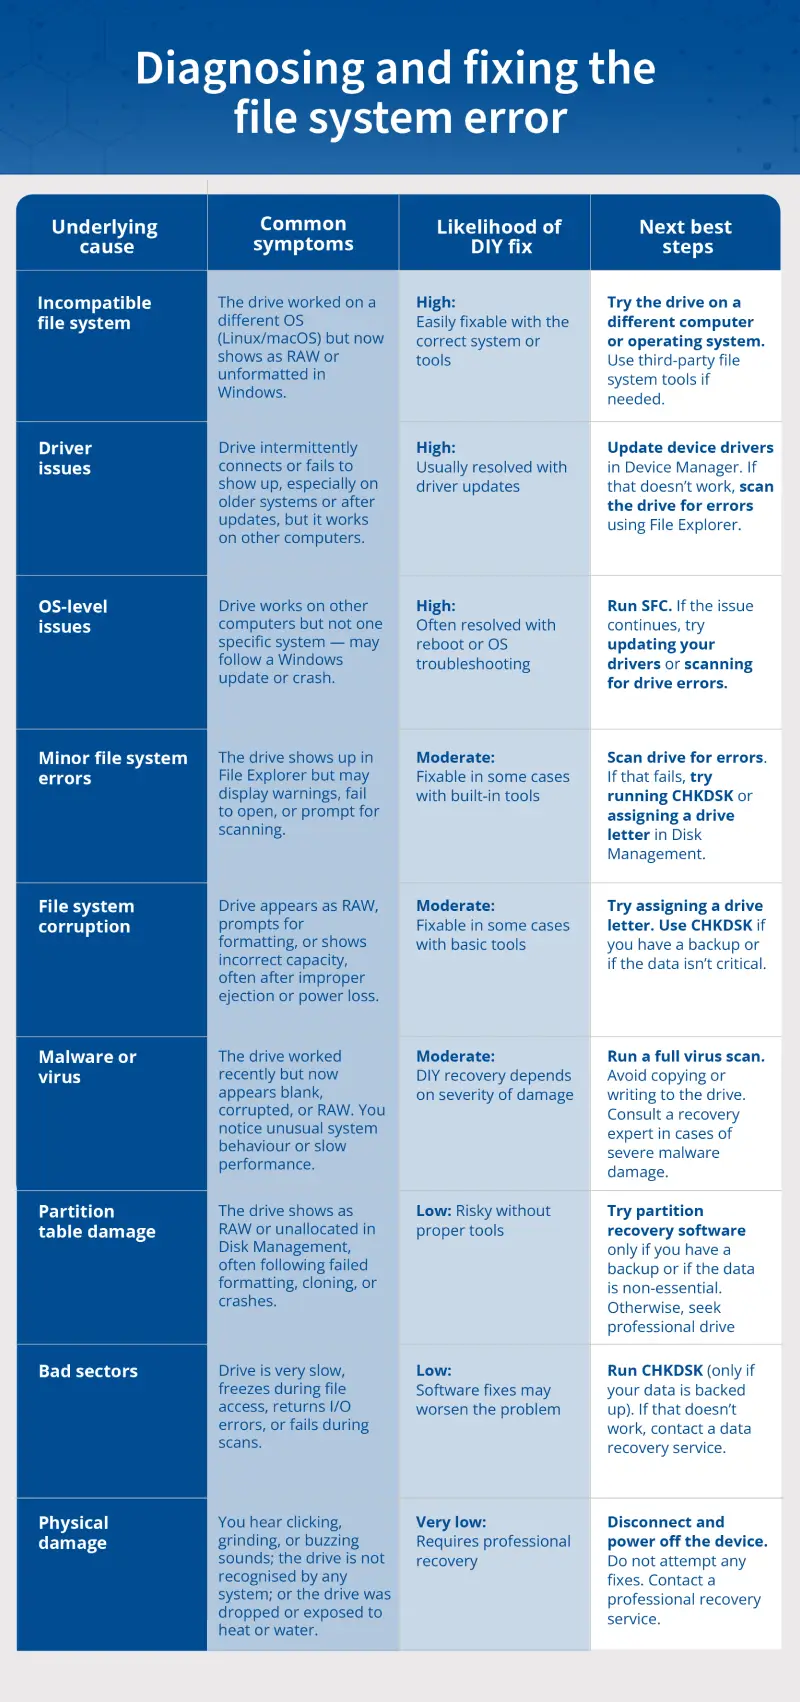
- Incompatible file system: If the drive previously worked on a Linux or macOS system and now shows as RAW or unformatted in Windows, the issue is likely due to an unsupported file system like EXT4, HFS+, or APFS. This is typically easy to resolve by using the drive with its original operating system or installing a file system reader. Try connecting the device to a compatible OS, or use third-party tools to access the data without reformatting.
- Driver issues: When a drive connects intermittently or fails to appear (especially after Windows updates or on older systems) but still works on other devices, outdated or missing drivers are often the cause. This is usually a straightforward fix with a high success rate. Update your drivers through Device Manager, and, if the problem persists, run a scan for drive errors in File Explorer.
- OS-level issues: If the drive functions on other computers but not on yours, particularly after a crash or system update, the problem may lie within your Windows installation. This type of issue is often resolved with simple operating system repairs. Start by running the System File Checker (SFC) to repair any corrupted system files, and follow up with driver updates or error scans if needed.
- Minor file system errors: A drive that appears in File Explorer but fails to open or shows warning prompts may be suffering from small, fixable issues in the file structure. These are moderately easy to repair using built-in Windows tools. Begin by scanning the drive for errors through File Explorer; if that doesn’t work, consider running CHKDSK or assigning a new drive letter in Disk Management.
- File system corruption: When a drive suddenly appears as RAW, displays the wrong capacity, or prompts for formatting (often after being improperly ejected or affected by a power loss) file system corruption is a likely cause. These cases can sometimes be resolved with caution, but they also risk data loss if handled incorrectly. Try assigning a drive letter or running CHKDSK only if you have a backup or don’t mind risking some data.
- Malware or virus: If your drive was working recently but now shows up as RAW or empty and your system is behaving strangely or running slowly, malware could be interfering with drive access. These situations are moderately fixable depending on the extent of the damage. Run a full antivirus scan first, and avoid modifying or copying data until the drive is confirmed clean.
- Partition table damage: A drive that appears as RAW or unallocated in Disk Management, especially after a failed format, clone, or system crash, may have a damaged or missing partition table. This kind of issue is risky to fix without proper tools and technical knowledge. Partition recovery software might help if the data isn’t critical, but professional recovery is the safer choice when the files are important.
- Bad sectors: When a drive is unusually slow, freezes during use, or throws I/O errors, it may have developed bad sectors, which are physically damaged parts of the disk surface. DIY fixes like CHKDSK can sometimes worsen the problem. If your data isn’t already backed up, it’s best to stop using the device and consult a data recovery professional immediately.
- Physical damage: If the drive emits clicking, buzzing, or grinding noises, or if it was dropped, exposed to liquid, or is not recognised by any computer, it’s likely suffering from physical damage. These cases are not recoverable with software and should never be opened or tampered with at home. Power down the device immediately and seek professional help to avoid permanent data loss.
While it’s completely understandable to want to fix the storage issue on your own, not every problem is suited to DIY recovery, especially when the data on the drive is irreplaceable. In many cases, basic errors can be resolved through driver updates, operating system compatibility fixes, or built-in system tools. But for more complex problems such as file system corruption or bad sectors, using the wrong method can actually make recovery more difficult or cause further data loss.
If you’re unsure of the root cause, or if your device contains critical data, the safest course is to get a free evaluation from a certified provider like Secure Data Recovery. Our engineers can assess the drive, determine the exact cause of the error, and perform data recovery in secure, controlled lab environments.
Troubleshooting “the volume does not contain a recognized file system” error
When your storage device triggers this error, it doesn’t always mean the data is gone for good. Often, the problem stems from driver issues, software issues, or formatting mismatches, many of which can be resolved with basic steps. Below are the most common troubleshooting methods for Windows 10 and Windows 11 systems, ordered from safest and simplest to more advanced and risky.
These fixes apply to a wide range of storage devices, including SD cards and external USBs. If you’re working specifically with a USB drive, you may also find our step-by-step guide on how to fix an unreadable USB drive in Windows especially helpful.
Method 1: Try the drive on a different computer or operating system
In many cases, this error is caused by a file system that your computer simply doesn’t recognise, such as a Linux file system (EXT) that is now being read on Windows. Trying the drive on a different computer or operating system helps determine if the issue is really with the drive or just with your current setup.
Caution: If you’re prompted to format the drive, don’t. That will erase all data stored on the device.
How to test the drive on a different computer or operating system:
- Try the drive on a Linux machine (if it was used on Linux).
- On Windows, you can install software like Linux File Systems for Windows (by Paragon) to read EXT-formatted drives.
- If available, try the drive on a different Windows PC to rule out a system-specific issue.
If the drive opens, it was a file system compatibility issue. Back up your data and reformat the drive to a compatible format like exFAT if needed. If the drive still shows as RAW or unrecognised, continue to method 2 to assign a drive letter using Disk Management.
Method 2: Assign a drive letter using Disk Management
Sometimes, your drive is recognised by Windows but doesn’t appear in File Explorer simply because it has no assigned drive letter. This can happen after connecting it to a new system or due to minor file system issues. Assigning a drive letter is a quick way to make the drive accessible again.
How to assign a drive letter:
- Press Windows + X and select Disk Management.
- Locate your drive.
- If it has a size listed but no letter, right-click it.
- Choose Change Drive Letter and Paths…, then click Add.
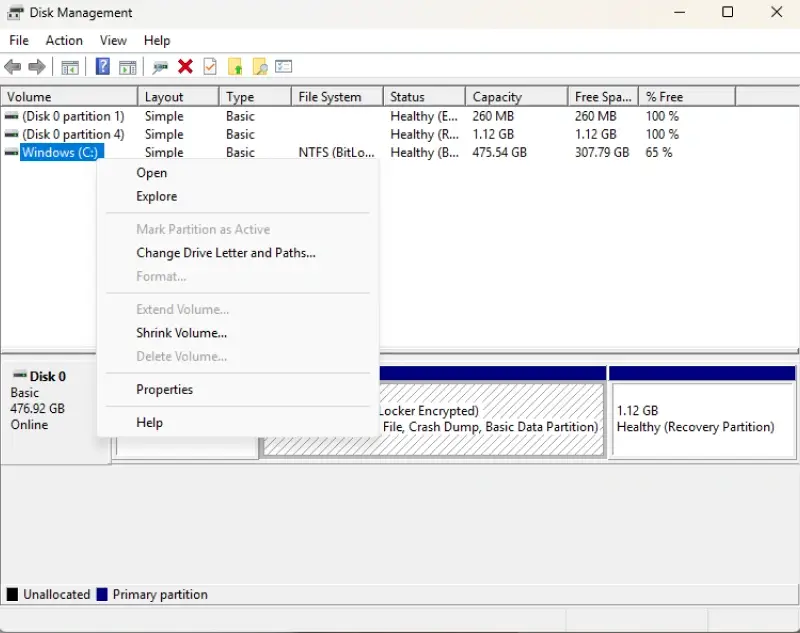
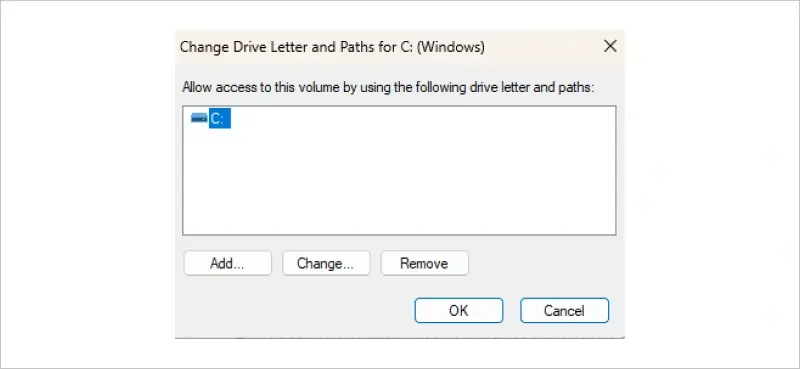
- Select an unused letter (like “E”) and click OK.
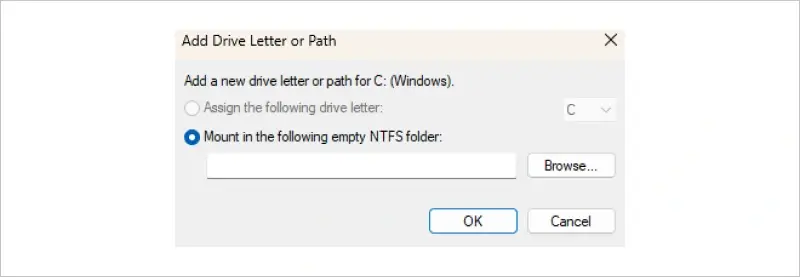
- When prompted about how programs that rely on the drive letter might not run correctly, select Yes.
If the drive appears in File Explorer, the root cause was a drive mounting issue. If you still don’t have access to the drive, or if it’s still marked as RAW, try updating the device drivers (method 3).
Method 3: Update device drivers in Device Manager
Corrupted or outdated drivers can prevent your system from recognising storage devices properly. If your drive intermittently appears and disappears or shows strange errors, updating or reinstalling the USB drivers and disk devices can often restore functionality.
How to update device drivers:
- Press Windows + X, then open Device Manager.
- Expand Disk Drives and Universal Serial Bus controllers.
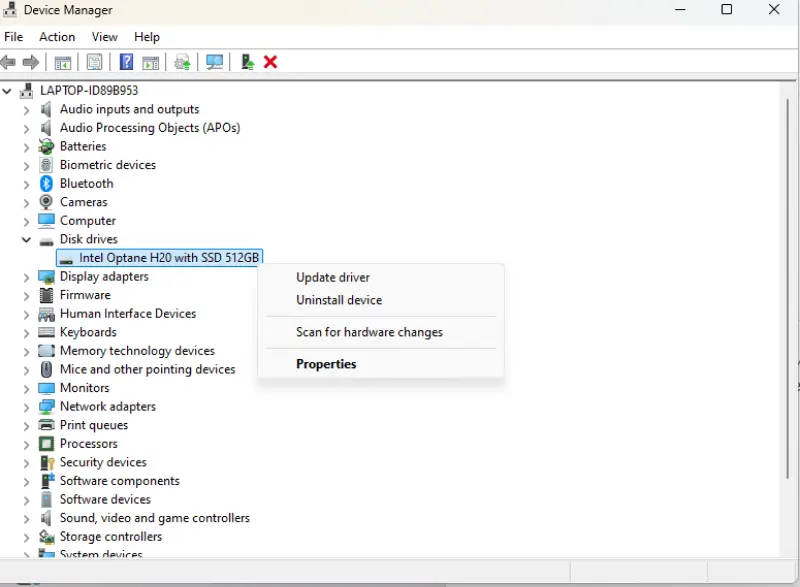
- Right-click your external drive and choose Update driver.
- Select Search automatically for drivers.
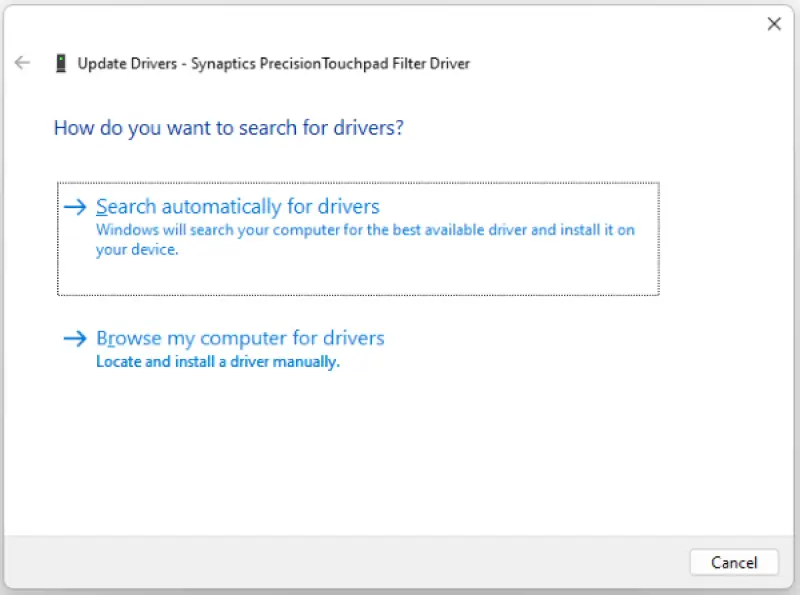
- If no update is found, you can also try Uninstall device, then reconnect the drive to force reinstallation.
If the drive appears and works normally, the issue was driver-related. If you’re still having trouble, try a quick error scan using method 4.
Method 4: Scan drive for errors using File Explorer
Minor file system errors can occur from improper ejection, interrupted file transfers, or unexpected shutdowns. This built-in tool in File Explorer scans the drive’s file structure and metadata for inconsistencies and can repair certain types of logical corruption without needing the command line.
Caution: If the scan reports problems it can’t fix, avoid repeated attempts and consider professional recovery for important data.
How to scan for drive errors:
- Open File Explorer and go to This PC.
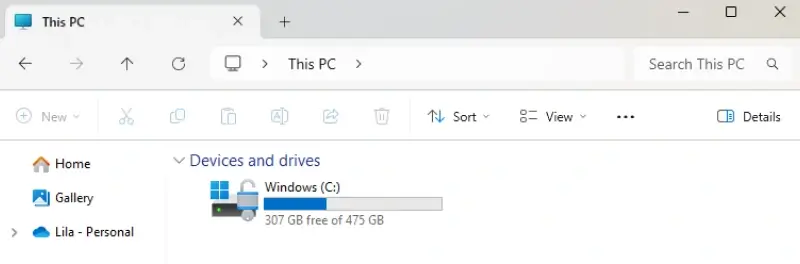
- Right-click the affected drive and choose Properties.
- Go to the Tools tab.
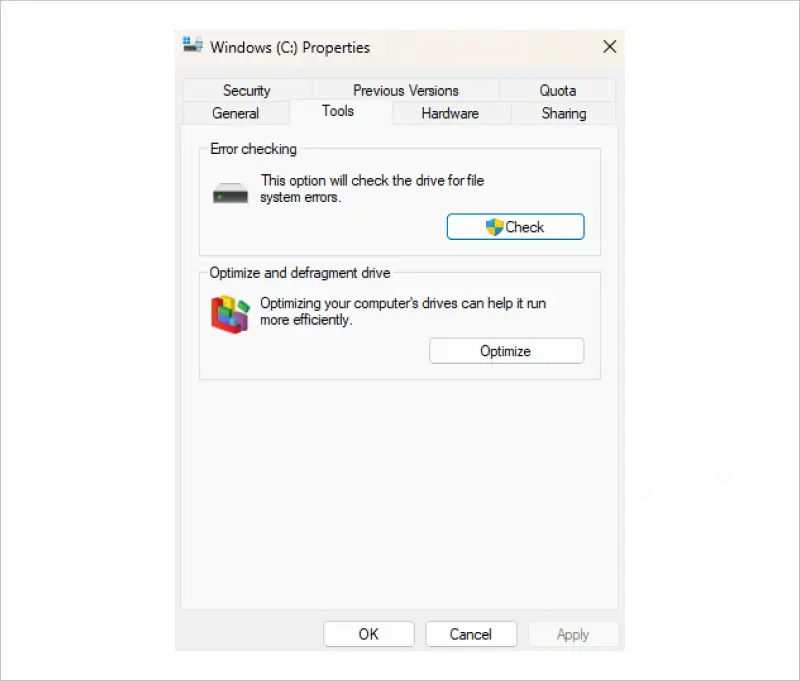
- Under Error checking, click Check.
- Click Start to begin the process.
- If errors are found, follow the prompts to fix them.
If the scan completes and your drive is accessible, the issue was likely a minor file system error. If the scan fails or can’t fix the issue, move on to method 5 to run a full malware scan.
Method 5: Run a full malware or virus scan
Some forms of malware and ransomware target storage devices, corrupting partition tables or hiding file systems. If the issue appeared suddenly, or if more than one device is affected, a full malware scan may reveal the cause.
Caution: Avoid copying, opening, or transferring files from the suspect drive until you confirm it’s malware-free.
Steps:
- Open Windows Security.
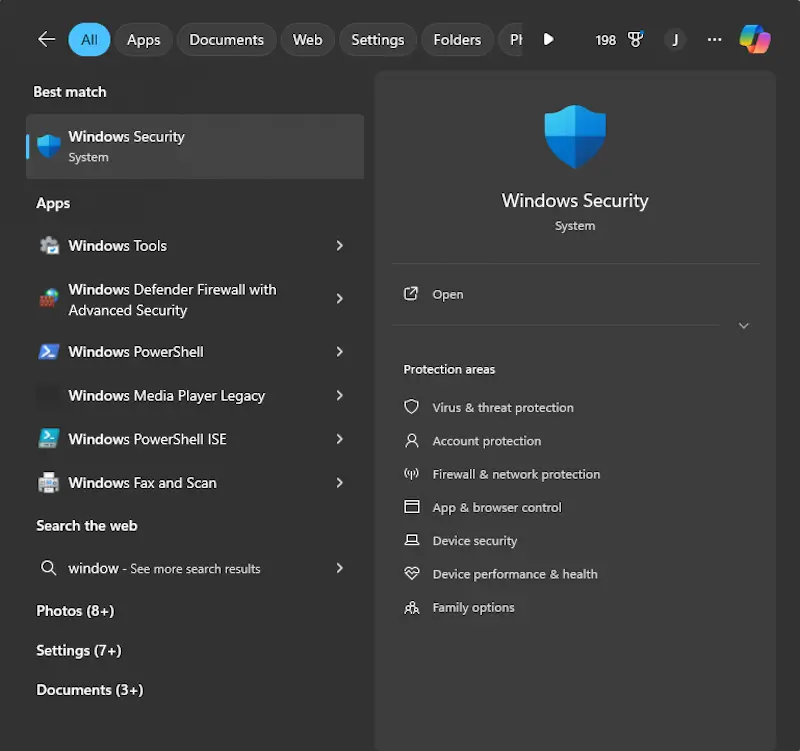
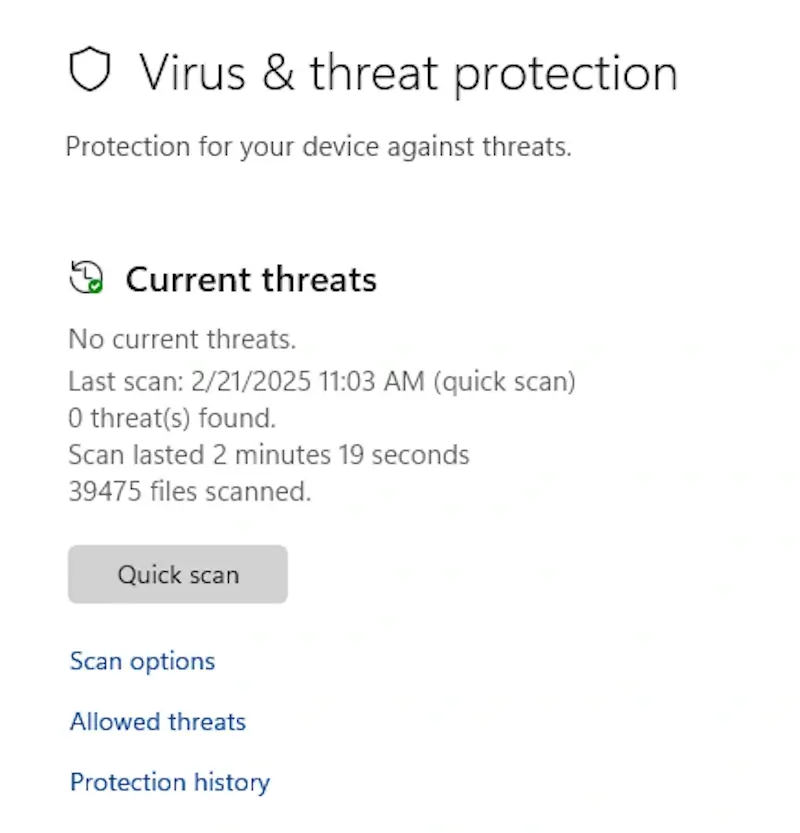
- Go to Settings > Privacy & Security > Windows Security > Virus & threat protection.
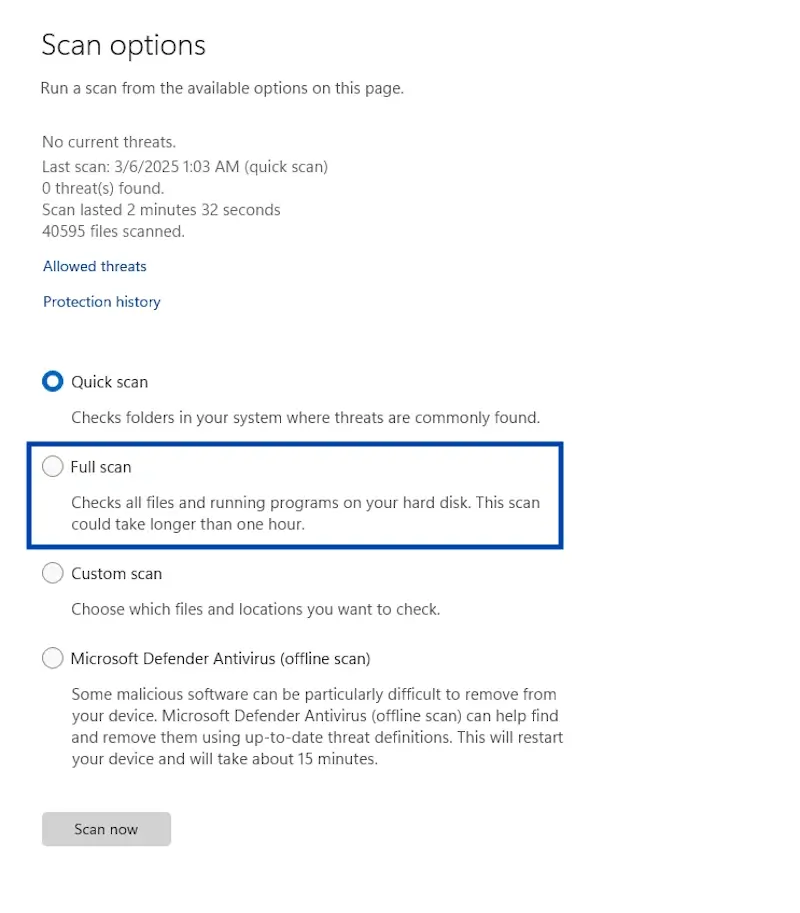
- Click Scan options, select Full scan, then click Scan now.
- Wait for the scan to complete. Restart your system afterward.
If the drive now works, the problem was likely malware-related. Back up your files and reformat the drive to ensure it’s clean. If you still don’t have access to the drive, try running SFC in method 6.
Method 6: Run System File Checker (SFC)
When your operating system has corrupted or missing system files, it may not mount drives correctly, even if the drive itself is fine. The System File Checker (SFC) tool checks for these problems and replaces faulty files with clean copies.
Steps:
- Click Start, type cmd, right-click Command Prompt, and choose Run as administrator.
- Type the below command and press Enter.
Command code:
sfc /scannow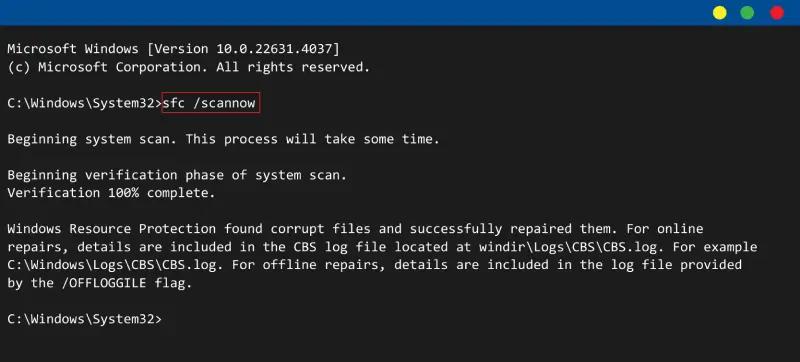
- Wait for the scan to complete (expect 10 to 20 minutes depending on your system size).
- Once complete, review the results.
- If it finds and fixes errors, try restarting your system.
If the drive works after restarting, the error was likely caused by corrupted system files. If the drive is still RAW or unreadable, it’s time to try the CHKDSK command (method 7).
Method 7: Use CHKDSK to check for file system errors
CHKDSK is a command-line utility that checks for and repairs logical file system errors. It’s useful for minor corruption, but it can also delete data it can’t fix, so use this only when your data isn’t important or is already backed up. You should not use CHKDSK if you suspect that you’re drive is failing.
Steps:
- Open Command Prompt as Administrator.
- Type the below command* and press Enter.
Command code:
*Replace X with your drive letter, so if your external drive is C, type the following: chkdsk C: /f /r
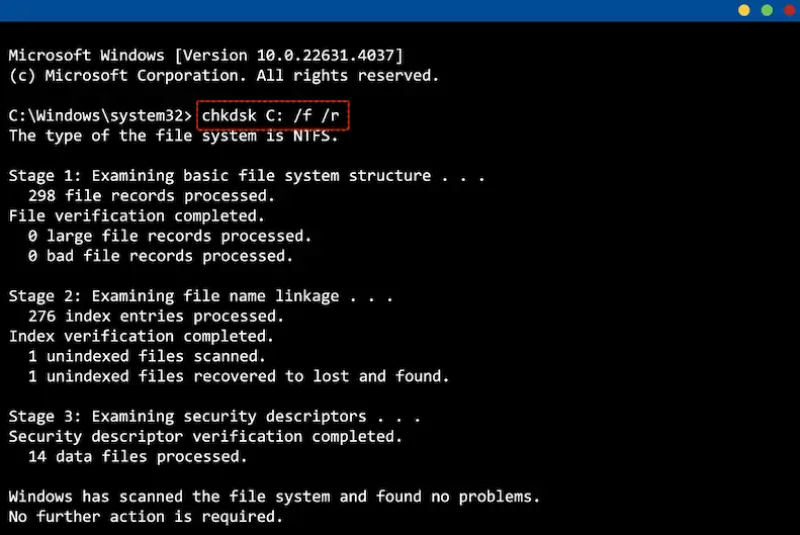
- Wait for CHKDSK to complete.
- This process may take a while, especially on larger drives.
If the drive is now accessible, the error was caused by file system corruption. If the drive is still RAW or inaccessible, you can try recovery software (method 8), but only if your data is already backed up or if you don’t care about losing it.
Method 8: Try partition recovery software
When the partition table (the structure that tells your system how the drive is organised) is damaged, the drive may appear as RAW or unallocated. Partition recovery tools attempt to rebuild that table and restore access.
Caution: Data recovery software can overwrite data if used incorrectly, resulting in data loss. Use them only for non-critical data or if you already have a backup, and install them on a separate drive.
Steps:
- Download a reputable data recovery tool.
- Install the software on a different drive (not the one you’re fixing).
- Scan the affected drive and follow the tool’s steps to attempt partition repair.
If you regain access, immediately back up your data and reformat the drive. If the software fails or shows no partitions, stop here and contact a recovery professional.
How to move forward when your system still won’t read the drive
If you’ve worked through all the troubleshooting steps and your drive is still unreadable, you still have reliable options available. At this point, the issue may involve more serious file system corruption, partition damage, or physical hardware failure, which often requires more than basic tools to resolve. Understanding your options now can help you make the right decision based on the value of your data and the condition of the device.
Contact a data recovery professional
If your drive contains important or irreplaceable files, the safest thing you can do is stop further troubleshooting and consult a data recovery professional. Continuing to experiment with DIY software or utilities, especially after multiple failed attempts, can reduce the chances of a successful recovery and may even cause permanent data loss.
At Secure Data Recovery, we help recover lost data from drives affected by:
- File system corruption
- Damaged partition tables
- Drives with bad sectors or failing hardware
- Physically damaged or non-responding devices
We offer:
- Certified cleanroom facilities
- Advanced tools for both physical and logical issues
- A no-recovery, no-fee guarantee
Even if other tools have failed, we can often recover data using advanced tools and certified cleanroom environments that go far beyond what’s possible at home. If your data matters, trust the experts who are equipped to handle even the most complex recovery scenarios safely and securely.
Reformat the drive once data is recovered
If the data on the drive is no longer needed, or you’ve already recovered it from a backup or professional service, formatting the drive will usually restore it to full functionality. A successful reformat will create a new, functional file system and make the storage device usable again.
Caution: Do not format the drive if there’s still a chance you’ll want to recover files from it. Even a “Quick Format" can overwrite essential file system structures, making future recovery attempts more difficult or even impossible.
To format a drive in Windows:
- Press Windows + X and choose Disk Management.
- Find the drive marked as RAW or unallocated.
- Right-click the volume and choose Format.
- Select a file system (see next section) and check Quick Format.
- Click OK to confirm.
Once the process is complete, the drive should appear normally in File Explorer and be ready for use like any other storage device.
Choose the right file system going forward
Once your drive is working again, take a moment to choose the right file system for your needs. Using the correct format helps prevent file system errors and improves compatibility with your devices.
The chart below outlines the most commonly used file systems and where they work best:
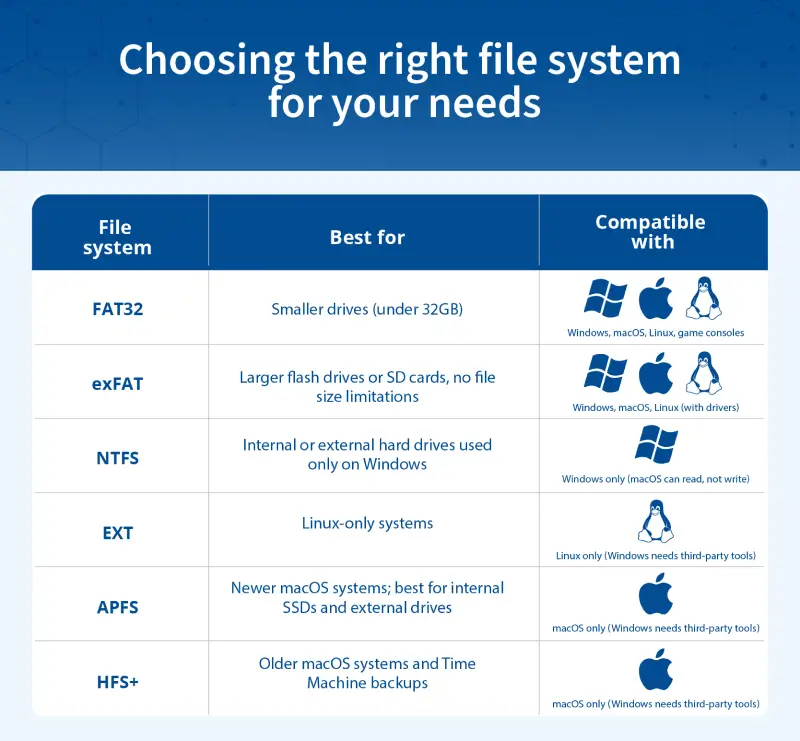
If you regularly move files between Windows and macOS, exFAT is the most reliable and flexible choice. For drives used exclusively with Microsoft Windows, NTFS offers better performance, support for large files, and features like file permissions and encryption. APFS, HFS+, and EXT are still great options for Mac-only or Linux-only environments, but they’re not ideal for use across platforms due to limited compatibility.
Choosing the right format upfront helps prevent file system errors and ensures smooth performance no matter how you use your device.
How to prevent file system errors in the future
Once your drive is back in working order, it’s worth taking a few proactive steps to help prevent file system errors from happening again. These small habits don’t take much time, but they can make a big difference in protecting your data, extending the life of your storage devices, and avoiding the frustration of unreadable drives down the road.
1. Always eject your drive safely
Unplugging a USB drive or external hard drive without ejecting it can interrupt data transfers and cause file system corruption. Use the “Safely Remove Hardware” option before disconnecting any storage device.
2. Use the right file system for your setup
Switching a drive between Windows, macOS, and Linux without using a compatible format can result in unreadable devices. If you regularly move files between different systems, format the drive as exFAT to avoid compatibility issues.
3. Keep your system and drivers updated
Outdated or missing drivers can stop your system from recognising drives properly. Regularly check Windows Update and Device Manager to make sure everything is current and compatible.
4. Avoid sudden shutdowns or unplugging during transfers
Power cuts or unplugging a drive mid-transfer can corrupt your file system or damage sectors. Always wait for file operations to finish, and use a battery backup (UPS) if you’re on a desktop to guard against power cuts.
5. Scan for malware regularly
Malware can corrupt partitions or hide file systems, making drives unreadable. Use reliable antivirus software and run full scans regularly to stay protected.
6. Pay attention to early warning signs
If your drive starts running slowly, freezes your system, or makes strange noises, those could be early signs of failure. Back up your data immediately and stop using the device until you can investigate further.
7. Back up your data regularly
Even healthy drives can fail without warning. Use the 3-2-1 rule: Keep three copies of your data, on two different types of storage, with one stored offsite or in the cloud to protect against accidental data loss.
By taking a few simple precautions, you can avoid many of the common causes of file system errors and protect your data from unexpected loss. While no storage device lasts forever, good habits and regular backups can make all the difference when things go wrong.
Recovering from a RAW or unreadable drive
Seeing the error “The volume does not contain a recognized file system” can be unsettling, especially when you’re not sure if your files are still safe. Fortunately, many causes of this error are manageable, whether it’s a simple compatibility issue or a deeper file system problem. And even when basic troubleshooting doesn’t resolve the problem, you still have a path forward.
If your drive contains important data you can’t afford to lose, don’t take unnecessary risks. Secure Data Recovery offers expert recovery services for everything from corrupted to damaged drives, with a free diagnostic exam and no-recovery, no-fee guarantee. Whether you’re dealing with a USB flash drive, external hard drive, memory card, or SSD, our team of experts are here to help you safely recover what matters most.