Few experiences are more alarming than a sudden system crash on your MacBook. One moment, you are working seamlessly; the next, your screen freezes, applications close unexpectedly, and critical files vanish without warning. As a result, the risk of permanent data loss becomes very real, and the consequences can be devastating for both personal users and businesses. MacBook crashes can occur for various reasons, including hardware failure, corrupted software updates, malware infections, or even accidental physical damage.
Secure Data Recovery, the trusted authority in SSD, RAID, and hard drive recovery, delivers expert solutions to even the most challenging MacBook data loss cases.
Common Causes of MacBook System Crashes
When a MacBook suddenly crashes, the underlying cause often falls into one of three categories: hardware failure, software corruption, or human error. Understanding these causes is essential to determining the best recovery approach.
Hardware Failures
Hardware-related problems are one of the most common reasons for unexpected MacBook crashes.
Common hardware failure causes include:
- SSD wear and failure.
- SSD controller malfunctions.
- Logic board issues.
- Firmware errors.
- Repeated hard restarts.
Software Corruption
Even minor software-related corruption can seriously affect file integrity and operating system functionality.
Typical software-related causes include:
- Failed macOS updates.
- Corrupted system files.
- Incomplete application installations.
- Malware infections.
Human Error
MacBooks are resilient, but human error frequently contributes to system crashes.
Examples of human errors include:
- Accidental deletion of critical system files.
- Improper shutdowns during updates.
- Incorrect drive formatting.
- Ignoring warning signs.
Pro Tip: If your MacBook shows signs of hardware failure (e.g., unusual noises, persistent freezing), stop using it immediately to avoid further damage.
Initial Steps to Take After a Crash

When your MacBook crashes unexpectedly, the first actions you take are critical.
Follow these essential steps:
1. Stay Calm and Avoid Panic: It can be tempting to restart or troubleshoot aggressively immediately. However, rushing can cause more harm.
- Do not force reboot your MacBook multiple times.
- Avoid installing recovery software without a proper diagnosis.
- Stay patient to minimise further risks.
2. Shut Down Safely (If Possible): If your MacBook is still responsive, shut it down properly.
- Click the Apple menu and choose Shut Down.
- If frozen, hold the power button gently until the device turns off.
- Disconnect the power source after shutting down.
3. Prevent Data Overwrites: Every new action on a damaged MacBook risks overwriting the lost data.
- Stop using the device immediately.
- Avoid saving any new files, downloads, or installations.
- Do not initialise or format any disks when prompted.
4. Disconnect From Networks: Malware or corrupted updates can continue to damage files if you stay online.
- Turn off WiFi by clicking the network icon and selecting Disconnect.
- Unplug Ethernet cables if connected.
5. Make a Note of Symptoms: Document what happened just before and during the crash - this could be critical for the recovery process.
- Record any error messages you see (such as kernel panic reports).
- Note unusual behaviour, like slow performance, clicking sounds, or flashing folders.
- Save screenshots or photos of error codes if possible.
Safe Methods for Attempting DIY Recovery
If your MacBook is physically intact and shows no signs of severe hardware failure, you can try several safe methods to recover your files.
1. Boot into Safe Mode
Safe Mode limits your Mac to essential functions, which can help bypass minor system errors.
- Shut down your MacBook completely.
- Restart and immediately press and hold the Shift key.
- Release Shift when you see the login window.
- Attempt to access your files or transfer them to an external drive.
- If you can access your files, back them up immediately.
2. Use Disk Utility
Disk Utility can repair minor disk errors that cause crashes.
- Restart your MacBook and hold Command + R to enter Recovery Mode.
- Select Disk Utility from the macOS Utilities window.
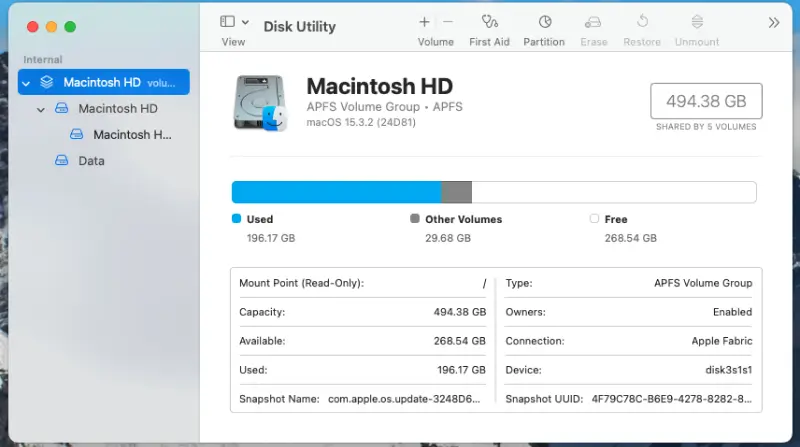
- Choose your startup disk and click First Aid.
- Allow the scan to complete and follow the recommended actions.
- Disk Utility can sometimes fix corrupted partitions or directory structures without wiping data.
Note: Use Disk Utility with caution. It can sometimes remove files when the tool encounters severe corruption, resulting in permanent data loss.
3. Try Target Disk Mode
Target Disk Mode turns your MacBook into an external drive, allowing you to transfer files to another Mac.
- Connect your crashed MacBook to another Mac using a Thunderbolt or USB-C cable.
- Restart the crashed Mac and hold down the T key.
- It should appear as an external disk on the healthy Mac.
- Transfer your important files carefully to another storage device.
- This method works best if the MacBook’s storage drive is intact, but the operating system is unstable.
4. Restore from a Time Machine Backup
If you set up Time Machine, restoring your files can be simple.
- Connect your Time Machine backup drive.
- Boot into Recovery Mode (Command + R during startup).
- Select Restore from Time Machine Backup from the Utilities menu.
- Follow the on-screen instructions to retrieve your files.
Note: Restoring from Time Machine provides one of the safest ways to recover lost data without risking file corruption.
Note: DIY recovery always carries a risk. Proceed carefully, and stop immediately if you encounter further issues.
Trust Experts for Critical MacBook Data Recovery
DIY recovery attempts may work for minor issues, but serious MacBook crashes demand professional expertise. Signs that you need to stop and seek professional help include:
- Physical signs of damage, such as clicking sounds, overheating, or visible liquid exposure.
- Repeated system failures, like kernel panics or endless restart loops.
- Disk Utility failures, such as errors that cannot be repaired.
- No access in Safe Mode or Target Disk Mode, indicating deep hardware or file system corruption.
- Missing backups, where every action could permanently overwrite critical files.
Continuing DIY recovery after these warning signs often worsens data loss, making eventual professional recovery harder or even impossible. Above all, recognising when to stop can make the difference between full file restoration and permanent loss.
Secure Data Recovery offers specialised, comprehensive solutions tailored precisely to your needs. Our team ensures a seamless and convenient recovery process for a hassle-free, high-performance data security solution.
Contact us today at 800-705-3701 to speak with our specialists and begin the secure recovery of your data.