There’s nothing quite as frustrating as inserting your USB drive into your computer, only to find that it isn’t recognized, can’t be accessed, or simply doesn’t show up.
Depending on the data on your drive that you’ve been locked out of, this can be anywhere from an inconvenience to a major disruption.
The good news is that an unreadable drive doesn’t mean your data is lost. Typically, it’s caused by hardware issues, driver conflicts, or file system errors, such as “The volume does not contain a recognized file system” error, and these can all be fixed with some simple troubleshooting.
In this comprehensive guide, we’ll walk you step-by-step through a few practical solutions to repair an unreadable USB drive on Windows 10 and 11. By systematically diagnosing the problem and then applying the relevant fixes, you can get all your data back.
We’ll also talk you through a few preventative measures to avoid running into a similar issue in the future. Let’s dive in and get your USB drive back up and running!
Why USB Drives Become Unreadable
USB drives can become unreadable for various reasons. Here are some of the most common reasons this happens:
- Hardware issues: Physical damage to your USB drive, such as internal damage or bent connectors, can cause it to become unreadable. Similarly, on the other end, issues with your computer’s USB ports, such as dirt accumulation or worn connectors, can also cause problems with reading your USB drive.
- Software and driver problems: Corrupted, outdated, or missing USB drivers could prevent Windows from recognizing your drive. Additionally, incorrect power management settings could also cause your drive to disconnect or become unreadable.
- File system corruption: Your USB’s file system may be corrupted. This typically occurs due to improper removal of the USB drive, malware infections, or power outages that prevent the data-writing process from completing correctly.
Once you identify the cause of your USB drive’s unreadability, you can proceed to follow the appropriate steps that will help you get back your data.
Basic Troubleshooting and Preliminary Checks
Before we dive into more complex solutions, let’s go through a few basic troubleshooting steps to rule out some of the more common issues.
- Restart your computer: While this might seem like it wouldn’t have much impact, restarting Windows can often resolve temporary software and driver glitches or conflicts.
- Check USB ports: Connect your USB drive to a different port on your computer. Each USB port can become less reliable over time, due to things like dust or general wear, causing connectivity issues.
- Test on another computer: If you have access to another computer, test out your USB drive on it to confirm whether the issue lies within your USB drive or your computer.
- Check your USB drive for physical damage: Carefully inspect your USB drive for any visible signs of damage, such as cracks in the casing or bent connectors.
- Check Windows Disk Management: To access Disk Management on Windows 10 and 11, press Windows + X and select “Disk Management”. If your USB drive appears here but doesn’t have an assigned drive letter, simply add one and you should then be able to access your drive.
If your USB drive is still unreadable following these basic checks, let’s move on to the next section for more advanced solutions.
Resolving Software and Driver Issues
Software and driver issues commonly cause USB drives to become unreadable. To make sure this isn’t the root cause of your problem, or to resolve it if it is, follow the steps below.
1. Update or Reinstall USB Drivers
- Access Device Manager by pressing Windows + X, then select Device Manager.
- Expand the Universal Serial Bus controllers section.
- If any devices in this section appear as Unknown Device, right-click on them and select Update driver.
- If this doesn’t help, then right-click again and select Uninstall device. Then, restart your computer to allow Windows to automatically reinstall the driver.
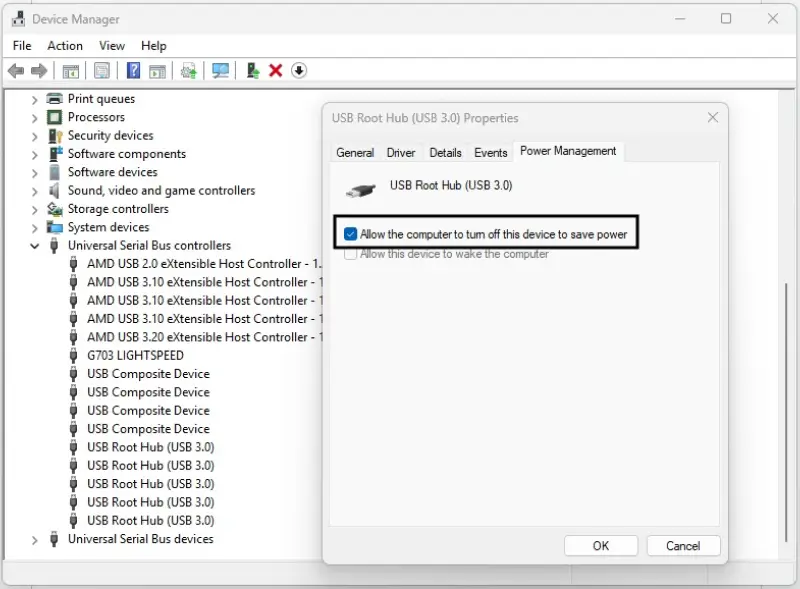
2. Adjust Power Management Settings
- Access Device Manager by pressing Windows + X, then select Device Manager.
- Expand the Universal Serial Bus controllers section.
- Right-click on any of the USB Root Hub entries in this section, and select Properties.
- Navigate to the Power Management tab, and uncheck Allow the computer to turn off this device to save power.
- Repeat this process for every USB Root Hub entry.
Following these steps often resolves software- and driver-related issues that prevent your USB from being detected properly. If these steps didn’t resolve the issue, proceed to the next section.
Fixing Disk Management Issues
If your USB drive appears in the Disk Management tool, but you’re still unable to access it, follow the steps below to correct common disk management issues.
1. Change or Assign a Drive Letter
- Open Disk Management on Windows 10 and 11 by pressingindows + X and select Disk Management.
- Right-click your USB drive and select Change Drive Letter and Paths.
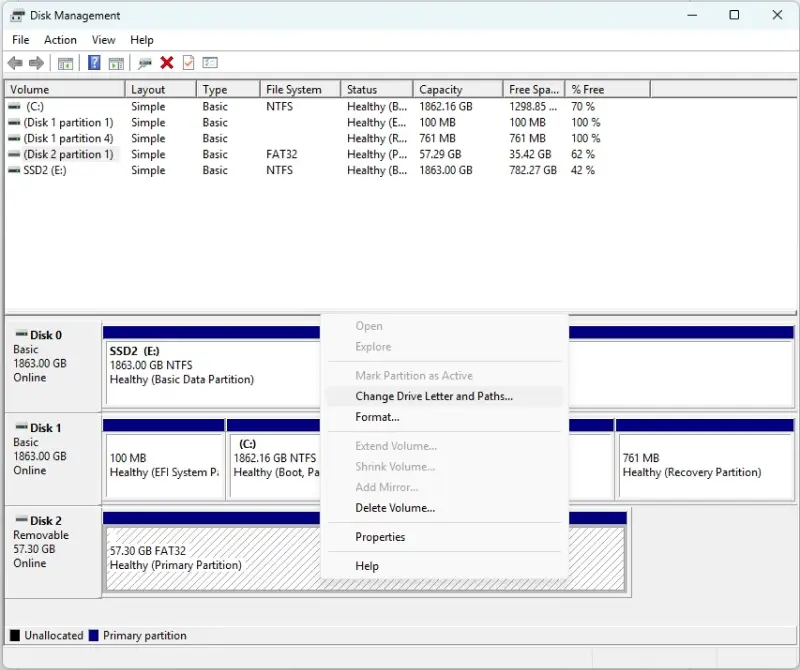
- Choose Add or Change and assign a new drive letter to your USB drive.
2. Initialize USB Drive
If your USB drive is showing as Not initialized, follow these steps to initialize it.
- Right-click on the USB drive labeled Not Initialized.
- Select Initialize Disk, choose a partition style (usually MBR for USB drives), and click OK.
3. Format USB Drive
Note that this step will erase all data on your USB drive, so if recovering the data on it is a priority, skip this step.
- Right-click the USB drive in Disk Management and select Format.
- Choose a suitable file system (FAT32 or NTFS), check the Perform a quick format option, and select OK.
Repairing File System Corruption
File system corruption can often be the cause of readability issues. Thankfully, Windows has built-in tools that you can use to address these issues.
1. CHKDSK Utility
- Type cmd into your Windows search bar, right click Command Prompt, and select Run as administrator.
- Enter the following command, replacing “X” with your USB drive’s assigned letter: chkdsk X: /f /r
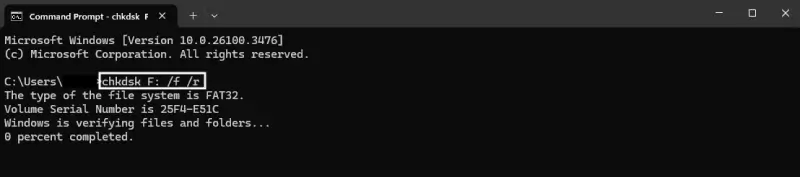
- Let the tool run and fix any errors it detects.
2. Windows Error Checking Tool
- Open File Explorer, then right-click on your USB drive and select Properties.
- Navigate to the Tools tab and click Check under the Error checking section.
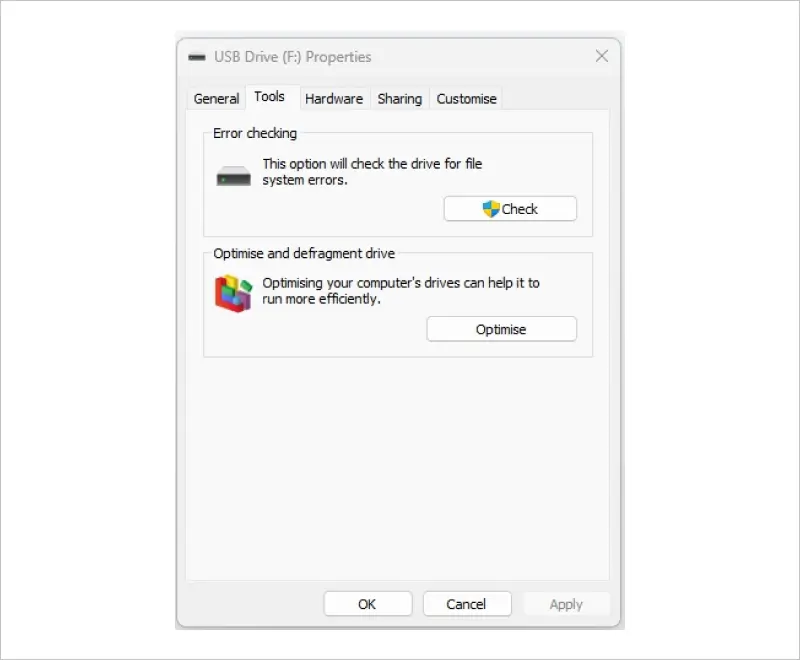
- Follow the prompts to complete the error checking and repair process.
In most cases involving file system corruption, these methods can effectively solve the problem and make your USB drive accessible again. If your drive is still unreadable, let’s move on to some more advanced methods you can use.
Advanced Troubleshooting and Recovery Methods
If none of the previous methods have successfully resolved your USB drive’s unreadability, consider using the advanced troubleshooting options below.
DiskPart Tool
- Open Command Prompt by typing cmd into your Windows search bar, right-click Command Prompt, and select Run as administrator.
- Type diskpart and press Enter.
- Use the following commands to reset and format your USB drive: (Note: You should only use this as a last resort. Formatting will erase all data from your drive)
- list disk
- select disk X (replace X with your USB disk number)
- clean
- create partition primary
- format fs=NTFS quick
- assign
Third-Party Recovery Software
If recovering the data stored on your unreadable USB drive is essential, then consider using a reliable third-party recovery utility such as SecureRecovery® for Flash.
To recover data from your USB drive using SecureRecovery® for Flash, follow these steps:
- Download SecureRecovery® for Flash for free flash drive recovery.
- Launch the software.
- Choose Open Partition from the menu.
- Select the device to scan when prompted and click OK.
- Choose the files to recover after the scan locates data.
- Click Save Selected Items to restore your files to a new folder.
These advanced methods should be used carefully, especially when they involve formatting, as this erases existing data. Always make sure you've attempted recovery steps first if you want to avoid permanently losing access to your files.
How to Avoid USB Drive Readability Issues
While you can never fully prevent the possibility of encountering USB drive issues in the future, there are certain steps you can take to minimize its risk.
Here are a few tips you can follow to help avoid this problem.
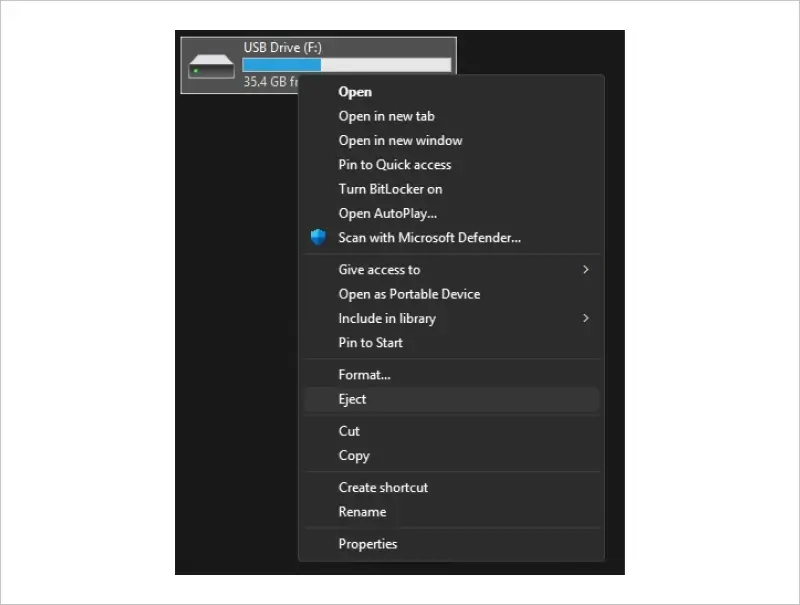
- Before you remove any USB drives from your computer, right-click on them in File Explorer and select Eject. This ensures that any data-writing processes finish before your drive disconnects.
- Keep your Windows and device drivers updated regularly.
- Use reliable antivirus software to protect your computer and your portable storage devices against malware that can corrupt your data or file systems.
- Regularly back up any important data you have stored on your USB drives.
By following these simple good-practice measures, you can greatly reduce the chance that your USB drives become unreadable and present potential data loss issues.
Get Professional Data Recovery
If you’ve carefully followed through each of the troubleshooting steps we’ve outlined in this article, but your USB drive remains unreadable, the issue might be beyond simple DIY fixes. Physical damage, severe file corruption, and complex hardware failures tend to require specialized tools and expertise to safely recover data.
In such cases, your best bet is to consult a trusted data recovery professional. Secure Data Recovery offers industry-leading services and can handle even the most severe cases of lost data.
Our engineers use cutting-edge tools and state-of-the-art labs to recover data from USB drives, regardless of the extent of the damage they’ve sustained. With certified cleanroom environments and a No Data, No Recovery Fee policy, Secure Data Recovery provides a risk-free way for you to reclaim your essential files.
Don’t risk permanent data loss by over-doing the DIY recovery attempts. If recovering your data is crucial, let the experienced professionals take over.
At Secure Data Recovery, we prioritize your privacy, security, and peace of mind, and we’ll have your data back to you in no time.
Call us for a free consultation and get your files back!