An external hard drive not showing up could be caused by several issues. A simple connection problem might prevent a Windows PC or Mac from recognizing your external hard drive. Or you may have forgotten the external drive in your car during a Winnipeg winter.
Thankfully, most issues have easy fixes, and more severe cases are still recoverable with the right response.
What To Know:
- Follow the best first steps regardless of your operating system (OS).
- To fix an external hard drive not detected by Windows, use built-in tools like Disk Management and Device Manager.
- Fixing an external hard drive not recognized by Mac involves apps like Disk Utility, System Report, and Terminal.
- If your data is essential, you can request help from an external drive recovery expert at any time.
Why Your External Hard Drive Is Not Showing Up
These are the most likely reasons why your external hard drive isn’t showing up:
- Loose or frayed cables
- Broken or underpowered USB port
- Missing drive letter or unmounted volume
- Corrupted or outdated drivers
- Corrupted or unsupported file system
- Physical damage or hardware failure
- Exposure to foreign substance or extreme temperatures
You can resolve some of these issues in minutes. Others will need professional help to retrieve data on the disk.
The exact failure type determines the ideal approach to troubleshooting detection problems on your PC or Mac.
Do These Things First
The following steps are relevant regardless of the OS you’re running.
1. Stop at the First Sign of Physical Damage
You can't fix a hard disk drive (HDD) with physical damage by changing settings or trying DIY repairs.
Continuing to use the external hard drive will only make it worse over time. Shut down the device as soon as possible in these circumstances.
Here are the most common signs of hardware failure:
- Strange clicking, grinding, or beeping noise
- Frequent disconnections or freezing
- Repeated system errors on file access
- Missing data or corrupted files
- No LED indicators when connected to USB ports
Contact a certified service for external hard drive recovery if you notice any of these symptoms. You risk permanent data loss.
2. Don’t Initialize, Format, or Erase Your External Drive
Windows or macOS might prompt you to initialize, format, or erase an external hard drive. Doing so on a previously working external device will wipe all stored data.
Decline the prompt and close the program. The external hard drive has logical errors that need to be addressed.
3. Don’t Run CHKDSK (Windows) or First Aid (Mac)
CHKDSK on Windows or First Aid on macOS can fix file system corruption. However, these tools prioritize file repair over data recovery.
As a result, they can leave important data stranded in inaccessible sectors, especially if the external hard drive is already compromised.
4. Check Your Connections
Trying a different cable, USB port, and computer are three of the easiest methods to troubleshoot an external hard drive.
Start by testing the device with a known working cable. Next, test a rear USB port for a more reliable power source. If the external drive still isn’t showing up on another desktop or laptop, the issue likely lies with the disk itself.
5. Establish Where the Computer Sees Your External Drive
Knowing whether your computer sees the external hard drive can help pinpoint the problem.
Check a few locations, depending on your OS.
To check where the connected external drive appears in Windows:
- Press the Windows key + E to open File Explorer, click This PC in the navigation pane, and search for the external drive under a different letter. Sometimes, a Windows Update can change its drive letter.
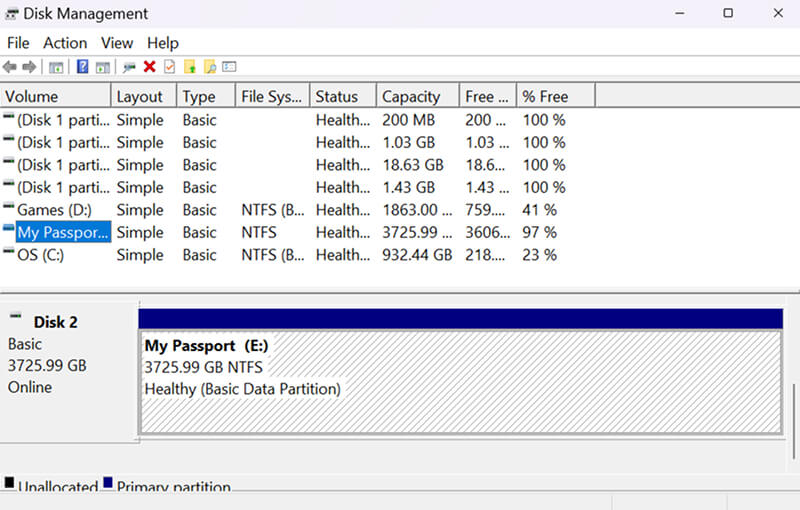
- Right-click the Start icon, select Disk Management, and find the device in the bottom pane. If Windows asks, don’t format or initialize a disk that used to work.
- Right-click the Start icon, choose Device Manager from the menu, and expand the Disk Drives category. A yellow warning icon indicates a conflict or device error.
- Restart the computer, use the manufacturer key to access the BIOS, and look for the device in the boot menu or storage section. Not every PC will list external drives, so no entry doesn’t mean the disk is dead.
To check where the connected external drive appears on Mac:
- Open Finder and see whether the external drive appears under the Locations section in the sidebar.
- Open Applications, click Utilities, choose Disk Utility, and select View, then Show All Devices from the drop-down menu. A grayed-out volume (the top of the list) means your Mac detects the device, but it isn’t mounted.
- Hold the Option key, click the Apple icon in the top-left corner, and choose System Information. If a disk shows up only here, the Mac sees the hardware but not the stored data.
The last place the external drive appears suggests where it’s failing. If it appears in Device Manager or System Info, then it’s likely a hardware conflict or failure.
If it appears in Disk Management but not File Explorer, then it’s likely a logical issue. The Mac equivalent would be showing up in Disk Utility but not Finder.
How To Fix External Hard Drive Not Showing Up in Windows
These steps for fixing an external hard drive not recognized by Windows are organized by safety and effectiveness.
Stop right away if the external drive shows as RAW, Unallocated, or Not Initialized in Disk Management. These statuses point to a serious problem. Listing the wrong size, such as 0 bytes, is also concerning.
Professional SSD or hard drive recovery provides the best results if your external device encounters these issues. We offer free shipping in Canada, diagnostics, and quotes as part of our standard service.
Step 1: Assign a New Drive Letter
Use when: Disk Management doesn’t have a letter assigned to a healthy or offline drive.
To assign a new drive letter to the external device:
- Right-click the Start icon and choose Disk Management from the menu.
- Right-click the disk label of an Offline external drive and select Online if necessary.
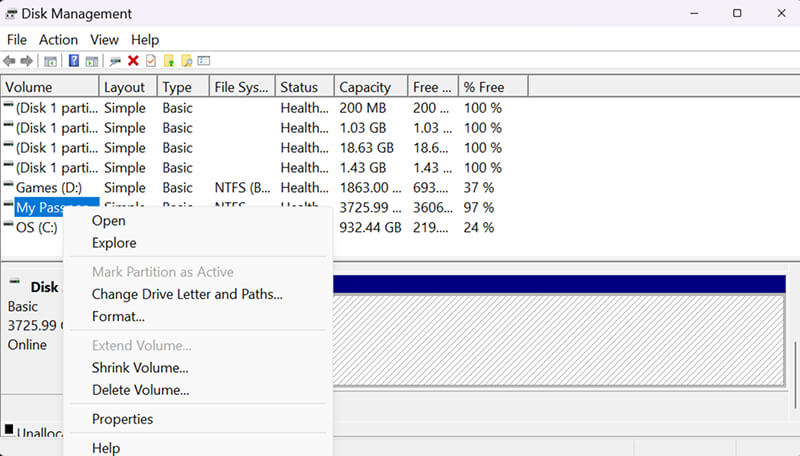
- Right-click the external drive and choose Change Drive Letter and Paths from the context menu.
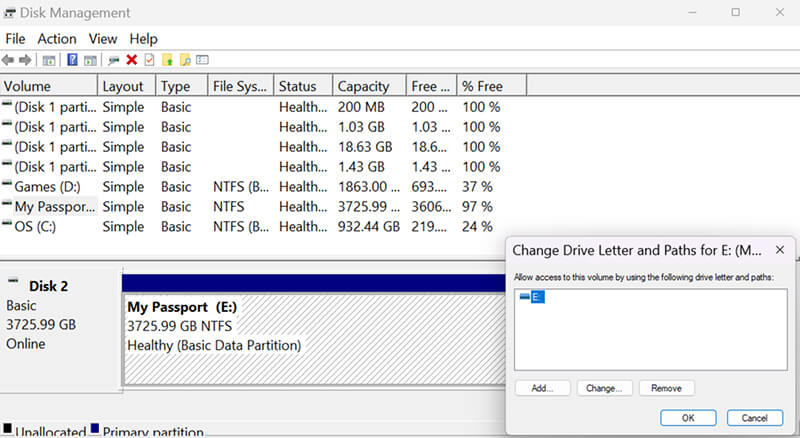
- Click the Add or Change button.
- Pick an unused drive letter for your disk.
- Press OK to confirm.
The external hard drive should show up in File Explorer after assigning the new letter.
Step 2: Reinstall Drivers
Use when: Device Manager displays the drive with a warning icon.
To reinstall drivers on an external device with bad drivers:
- Right-click the Start icon and select Device Manager from the list.
- Expand the Disk drives category.
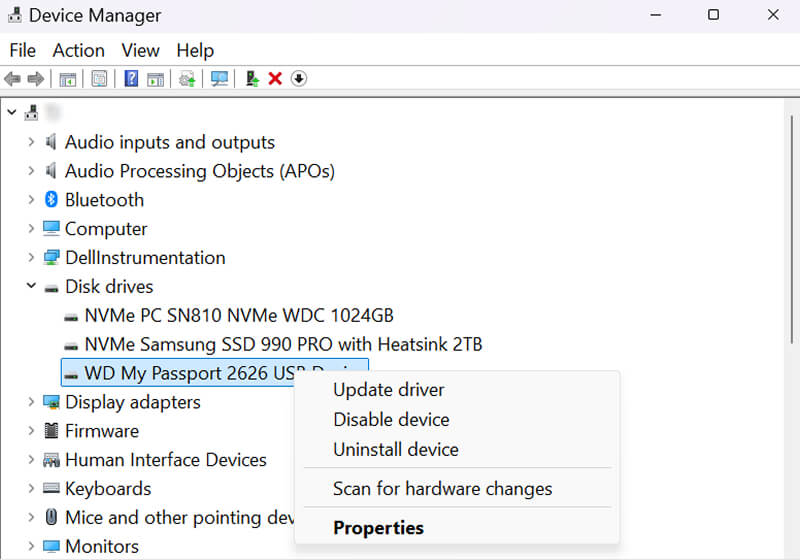
- Right-click the external hard drive and choose Uninstall device.
- Unplug your device from the USB port.
- Reconnect your drive after 10 seconds.
Windows will automatically reinstall the default driver for the external HDD.
Step 3: Reinstall USB Controllers
Use when: You get a repeated “USB device not recognized” error message.
- Right-click the Start icon and choose Device Manager.
- Expand the Universal Serial Bus controllers category.
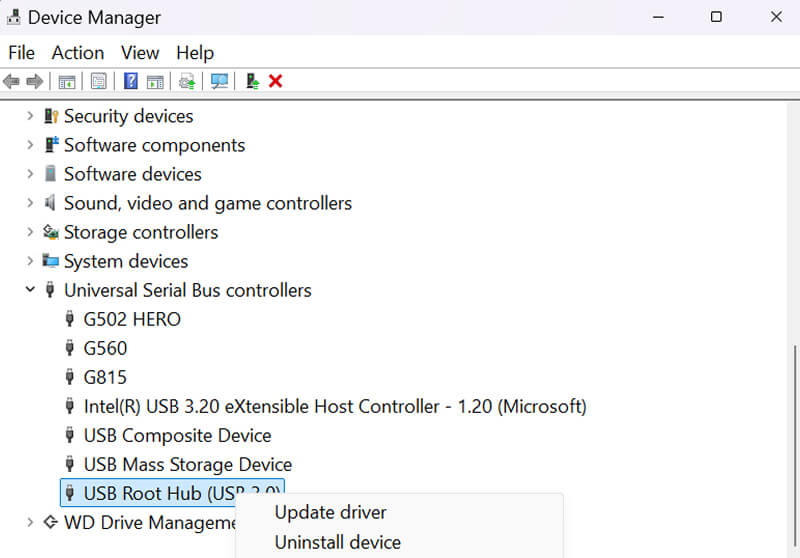
- Right-click each USB Root Hub and select Uninstall device from the context menu.
- Reboot your computer.
Windows will reinstall the controllers on restart.
Note: A USB keyboard and mouse will stop working until you restart. Let the system sit idle for a few moments to complete background tasks. Then, press and hold the Power button for 5 to 10 seconds to force a restart.
Step 4: Turn Off USB Selective Suspend
Use when: Your external hard drive keeps disconnecting on its own. This power management setting especially affects external drives on laptops.
To turn off USB selective suspend:
- Type Control Panel in the Windows search bar.
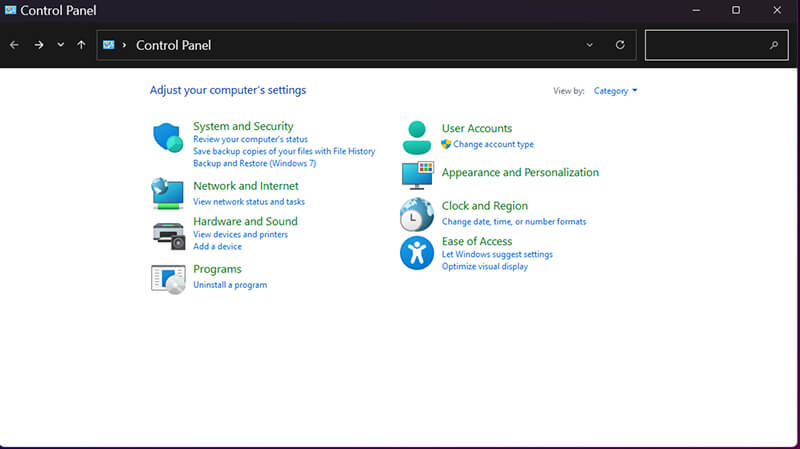
- Click System and Security.
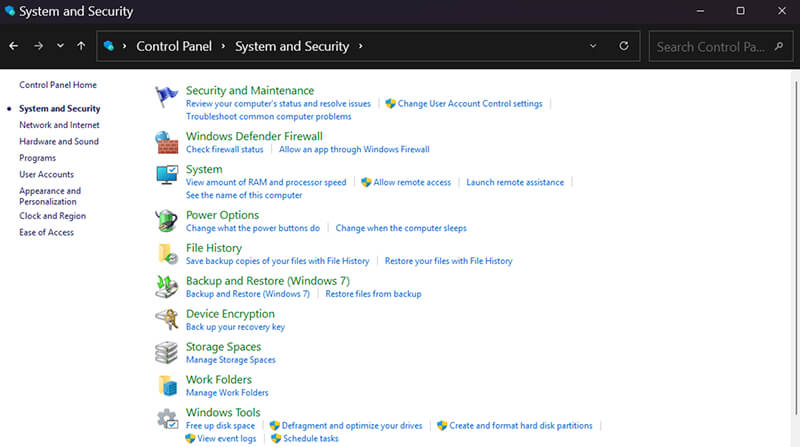
- Click Power Options.
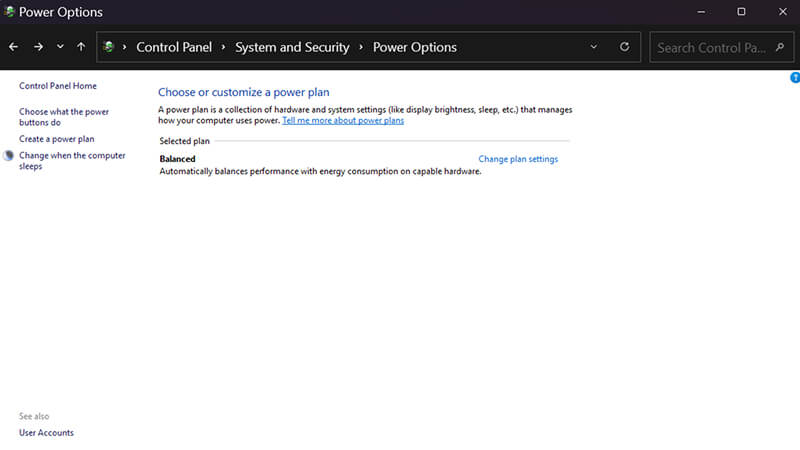
- Choose Change plan settings.
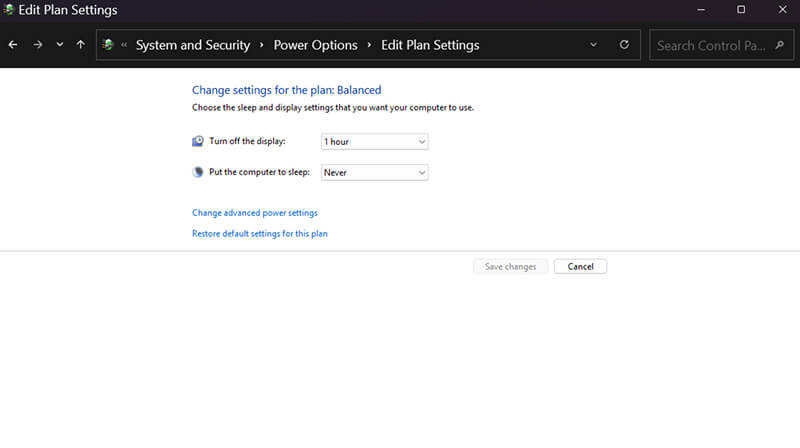
- Click Change advanced power settings.
- Expand USB settings.
- Set USB selective suspend setting to Disabled.
If USB settings aren’t listed, then your PC doesn’t allow for changes. Skip this step.
Step 5: Check the BIOS
Use when: Your external hard drive isn’t detected anywhere in Windows.
To enter the BIOS in Windows 11:
- Right-click the Start icon and choose Settings.
- Click System in the left sidebar.
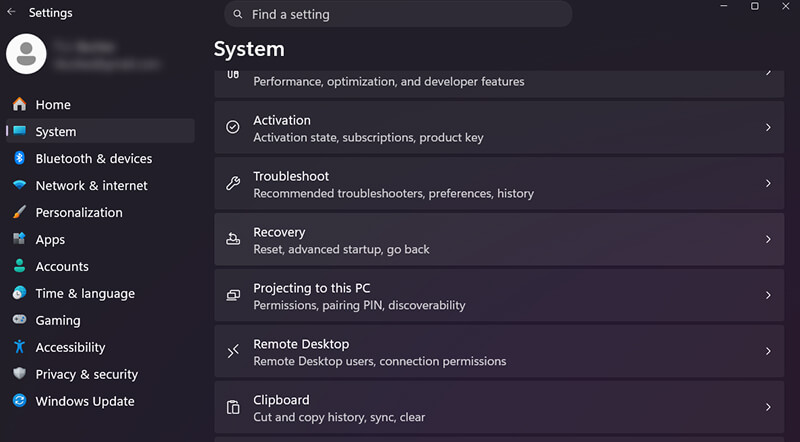
- Click Recovery.
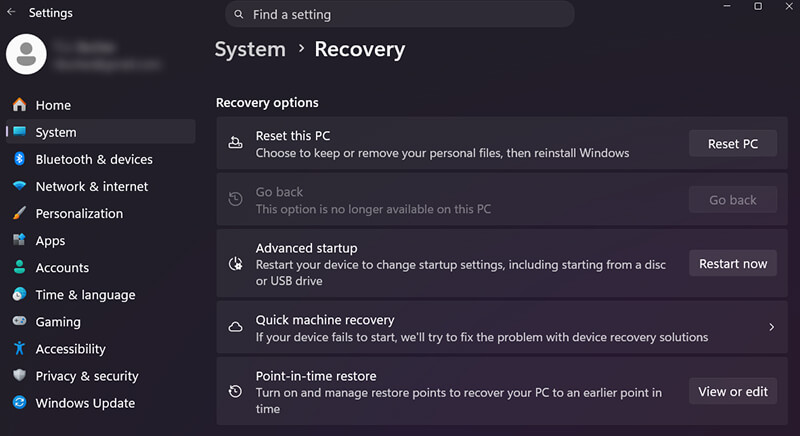
- Click Restart now under Advanced startup.
- Click Troubleshoot after the PC restarts.
- Choose Advanced options.
- Click UEFI Firmware Settings.
- Select Restart.
Your PC will boot directly into the BIOS. Once inside, you can see whether your external drive appears at the hardware level.
To check the BIOS:
- Review the boot menu and storage section for your model.
- Ensure that USB ports and USB storage are enabled.
- Exit without saving changes.
Some computers won’t show external drives. In that case, test on a second PC. In addition, many IT departments disable USB storage on work computers.
If your drive doesn’t appear in the BIOS, the storage device itself may have failed.
How To Fix External Hard Drive Not Showing Up on Mac
Start with the fix that matches where your Mac detects the external hard drive in the steps mentioned earlier.
Don’t keep using a disk that shows as an Unsupported File System, Free Space, or Uninitialized. Any of these states on an external device that used to work is a sign of failure.
Contact a certified expert for external drive data recovery if your device suddenly vanishes. We are an Apple Authorized Service Provider with Apple Certified Mac Technicians (ACMTs). Our service includes free domestic shipping for Canadian residents and fixed quotes with no obligation.
Step 1: Allow the Accessory to Connect
Use when: You have a newer Mac and the external hard drive never appears.
Macs with an Apple silicon chip will ask you to allow an accessory before connecting it.
To allow an accessory in macOS:
- Unlock your Mac.
- Plug the external drive back into your Mac.
- Click Allow when macOS asks you.
Check if your storage device appears now.
Note: Don’t see a prompt? Open System Settings in the Dock. Go to Privacy & Security options and set accessories to connect automatically. Reconnect the external drive again after updating the settings.
Step 2: Enable External Disks in Finder
Use when: Your external hard drive is visible in Disk Utility but not in Finder.
To enable external disks in Finder:
- Open Finder in the Dock.
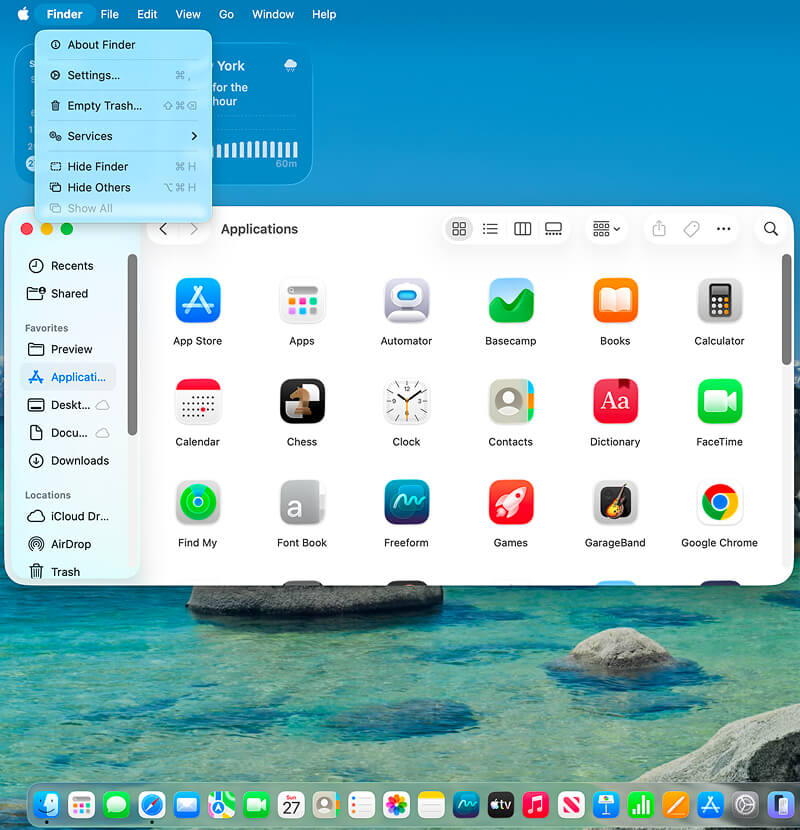
- Click Finder in the menu bar at the top of the screen.
- Select Settings.
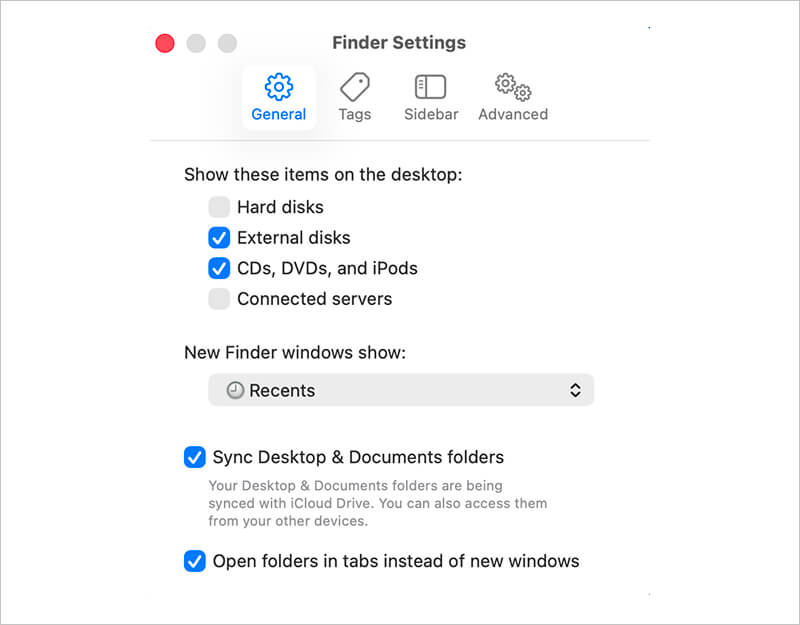
- Check External disks in the General tab.
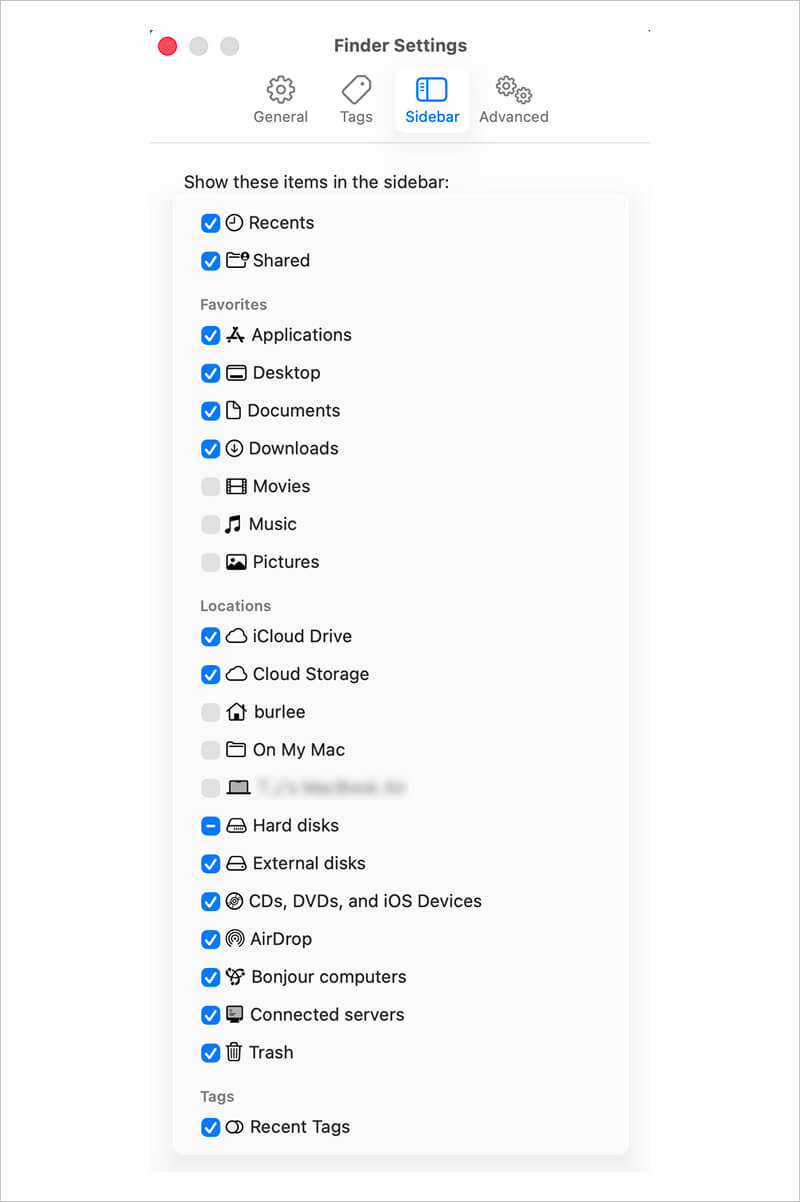
- Check External disks in the Sidebar tab.
See if macOS detects your external drive after the change.
Step 3: Mount Device in Disk Utility
Use when: The external HDD’s volume is grayed out in Disk Utility.
You might need to mount the device to integrate it within the macOS folder structure. Otherwise, your Mac won’t be able to read files on the drive or write data to the device.
To mount the external drive:
- Type Disk Utility in Spotlight Search in the top-right corner.
- Click View in the app’s menu bar.
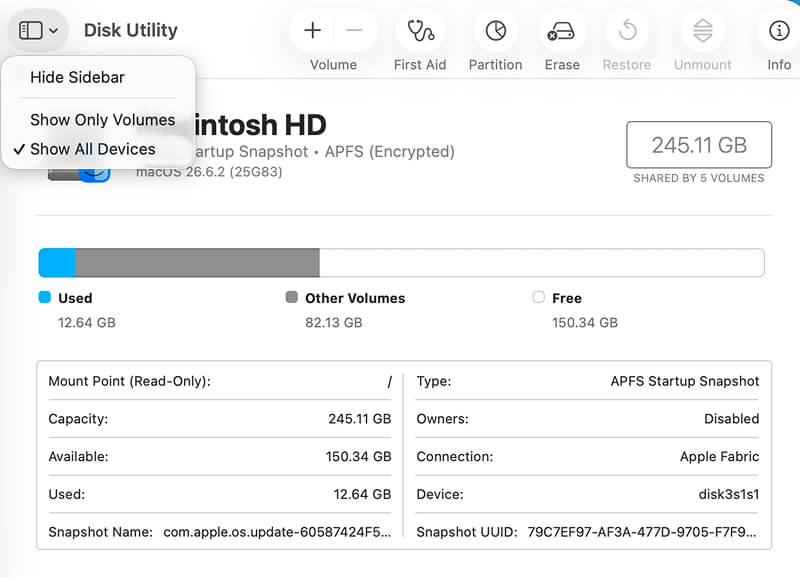
- Select Show All Devices.
- Choose the grayed-out volume in the sidebar.
- Click Mount.
- Enter the drive’s passcode if prompted.
Don’t repeatedly try to mount the volume if it won’t. Forcing a failing drive to mount could destroy your data.
Step 4: Enter Diskutil Commands in Terminal
Use when: The drive doesn’t appear in Disk Utility, or the app freezes.
The following commands are read-only. They will not edit or erase data stored on the device.
To troubleshoot a Mac external hard drive in Terminal:
- Type Terminal in Spotlight Search in the top-right corner.
- Type diskutil list external to see connected drives.
- Type diskutil info diskX, where X is your drive’s unique identifier.
If the external hard drive isn’t listed, then macOS doesn’t detect it. A drive that appears and disappears, displays the wrong size, or shows no partition may be failing.
Step 5: Check Connections in System Information
Use when: Your external device isn’t listed in Disk Utility or Terminal.
On occasion, macOS might not recognize an external drive because of other hardware issues.
To check Thunderbolt and USB connections in System Information:
- Hold the Option key and click the Apple icon in the top-left corner.
- Select System Information.
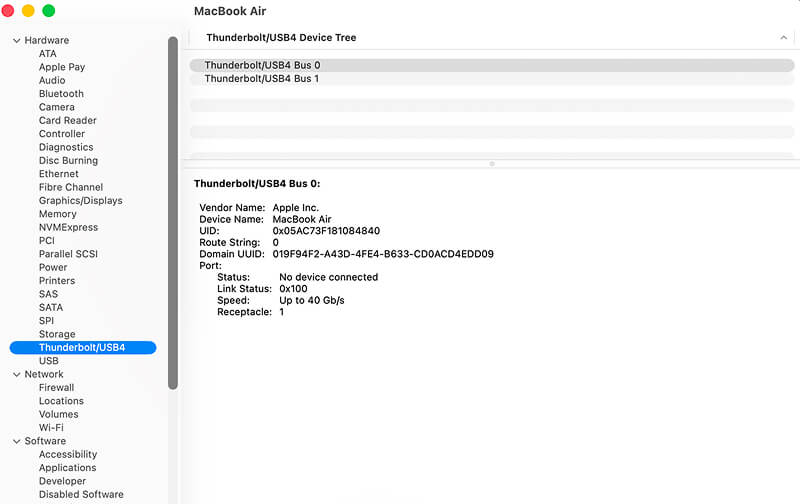
- Look at USB and Thunderbolt/USB4 connections in the Hardware section.
If your Mac sees the enclosure but not the storage media, then stop. Further actions could cause additional damage to the disk.
A Note on Reformatting
Many instances of an external hard drive not showing up on a Mac result from an incompatible file system. Your disk works on Windows, but not on macOS.
Reformatting an external hard drive with APFS or HFS Plus to work on your Mac will erase data on the device. Don’t reformat the drive to fix the compatibility issue if you need the files on it.
Troubleshooting That Complicates Data Recovery Efforts
Two of the most common mistakes when fixing an external hard drive are opening the enclosure and running data recovery software.
Removing External Hard Drive From USB Enclosure
DIY advice often suggests removing your disk from its USB enclosure and connecting it inside a desktop.
However, some portable hard drives use the USB chips for encryption and their own printed circuit board (PCB) for connectors. Windows still won’t show the hard drive in either case. Plus, removal can void your product warranty.
Leave the external hard drive in its case if saving your data matters.
Using Data Recovery Software
Data recovery software can be a convenient solution for simple logical errors.
Yet, it still requires the OS to detect the external device at some level. Also, these tools could force a damaged disk to run for hours, depending on the amount of stored data. An external hard drive that’s already compromised might not survive the extra strain.
External Hard Drive Recovery in Canada

If your external hard drive still doesn’t show up after completing the steps above, Secure Data Recovery can help. We can safely recover data from a broken hard drive in a Class 10 ISO 4 cleanroom.
Our data recovery services feature free diagnostics and quotes. You can drop off your drive at our Toronto lab, one of our other locations across Canada, or receive a prepaid shipping label. Once finished, we return your recovered files on a brand-new encrypted external drive to protect your privacy and security.
If we can’t recover your data, you pay nothing. That’s our No Data, No Recovery Fee guarantee.
Call us at 800-705-3701 or fill out our form to get a free quote online.